

Now that you’ve started your Squarespace trial and set up your Squarespace website, it’s time to start customizing the site to your needs.
But before you dive into the design, you’ll need to build a foundation for your new site by setting up your navigation menu, adding pages, and filling out those pages using blocks.
This post will walk you through how simple it is to build a foundation for your website using Squarespace.

Navigation
Your site’s navigation is a set of links that directs visitors to your site content.
A navigation menu typically displays at the top of your site, although some templates support navigation in a footer or sidebar.
Main Navigation
Pages linked in the Main Navigation are the visible pages featured in the navigation bar at the top of your site.
You'll notice that the order my pages are listed in the left-hand column mimics the order they're listed at the top of my site.

If you’d like to switch the order of your pages, you can simply drag and drop the pages into the order you’d prefer in the left-hand column.
Footer Navigation
Pages linked in the Footer Navigation are the visible pages featured in the secondary navigation at the bottom of your site (if your template supports a secondary navigation).
The order of the links in the left-hand panel also mimics the order they’re listed across the bottom of my site.

If you’d like to switch the order of your pages, you can simply drag and drop the pages into the order you would prefer.
Not Linked
Not Linked pages are pages on your website that cannot be accessed from the main or footer navigation, but may be accessed from other parts of your website.
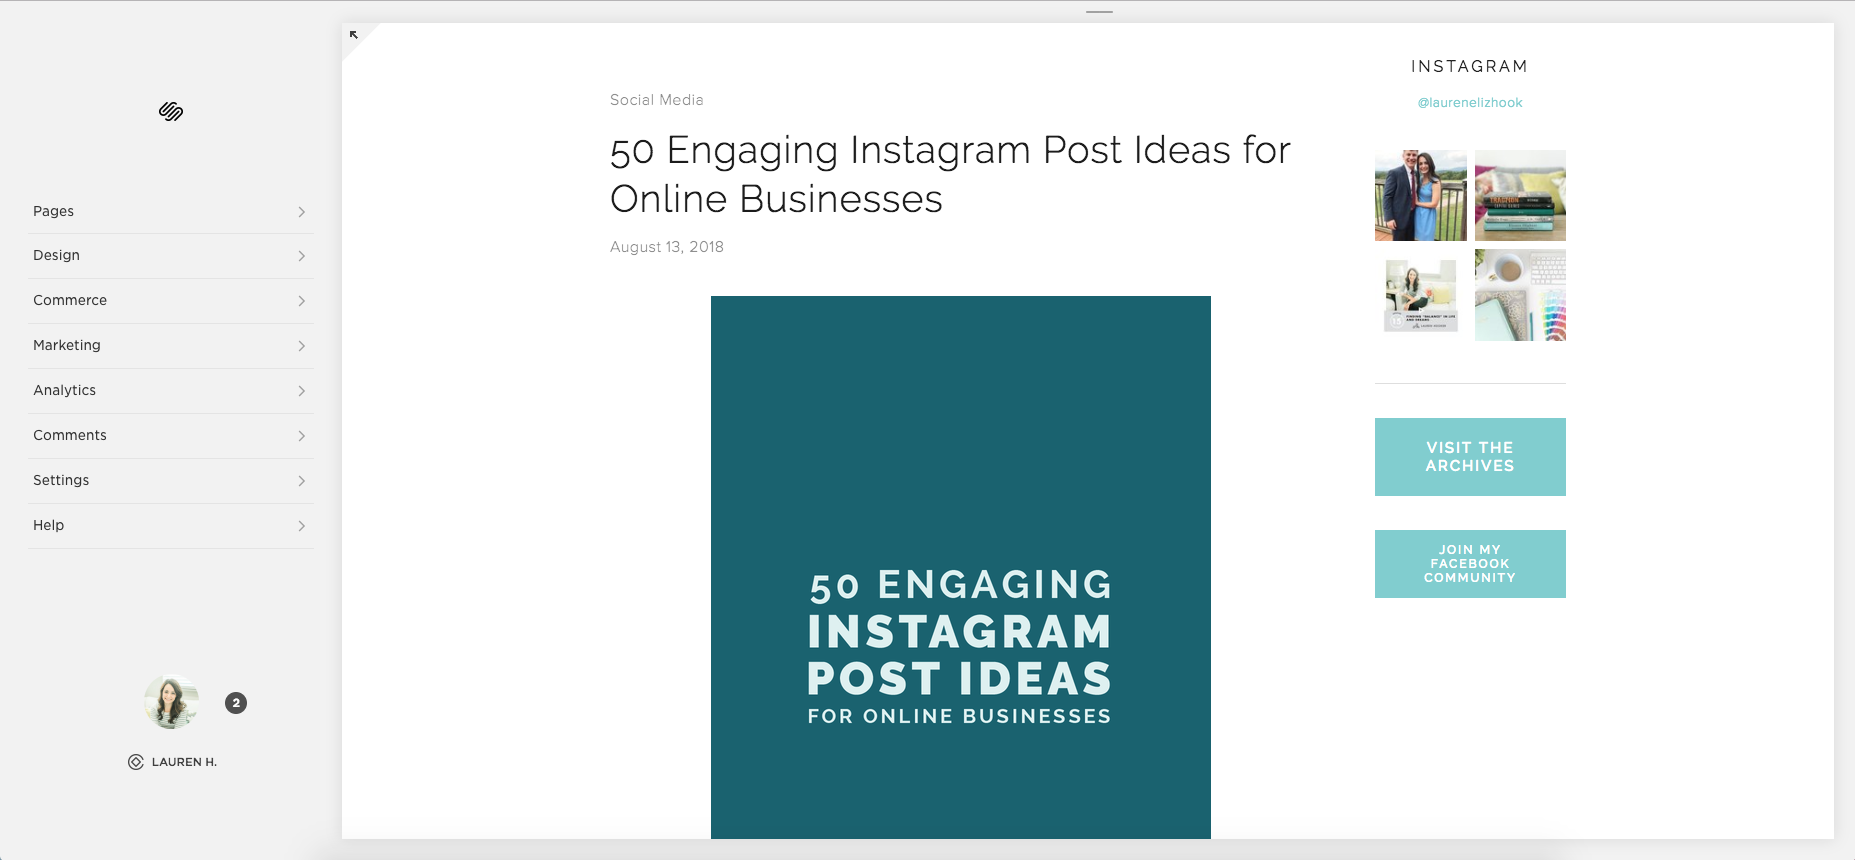
For example, I didn't want to include my Archives page in my Main Navigation or my Footer Navigation, but I wanted to be able to link to it in my blog sidebar. I set it up as an unlinked page and it's hidden from sight until a visitor clicks on its direct link in my blog sidebar.
Things to consider when setting up your navigation
When talking about the navigation (or menu as it’s most often called) on your website, the question of how many links to have in your menu always pops up.
I suggest no more than six links. It's simpler, less overwhelming for your visitors, and it helps organize the information on your site.
You also want to be sure to keep the copy as simple and straightforward as possible.
While ‘Home’, ‘About’, ‘Services’, ‘Contact’, ‘Blog’, etc. may seem boring and overused, your visitors will never have to guess what page that links to.
Marie Forleo has a great MarieTV episode where she shares one tip to improve your copywriting quickly. Skip ahead to 4:22 for the information specific to website navigations.
If you’re looking for a Squarespace template with sidebar navigation, footer navigation, multiple navigations, etc., Paige Brunton compiled an amazing blog post that lists which templates have features like a sidebar, index pages, parallax scrolling, second navigations and more.
Customizing your navigation
Once your navigation is set up, you can use the Style Editor (found in the Design menu) to tweak the look of your navigation. Every template family has its own Style Editor, so the options available for updating your navigation links can vary.

Scroll through the tweaks on the left hand side and look for tweaks that include the word Navigation.
Some of the tweaks you can make to your navigation include changing the font, size, color, position, spacing between and around links, hover options, etc. For a more in-depth how-to on styling your navigation, Squarespace has a fantastic help file.
Pages
Pages are the components that make up your site and house your content.
You can use a variety of pages to create your site’s content. Depending on your template, you have several page options.
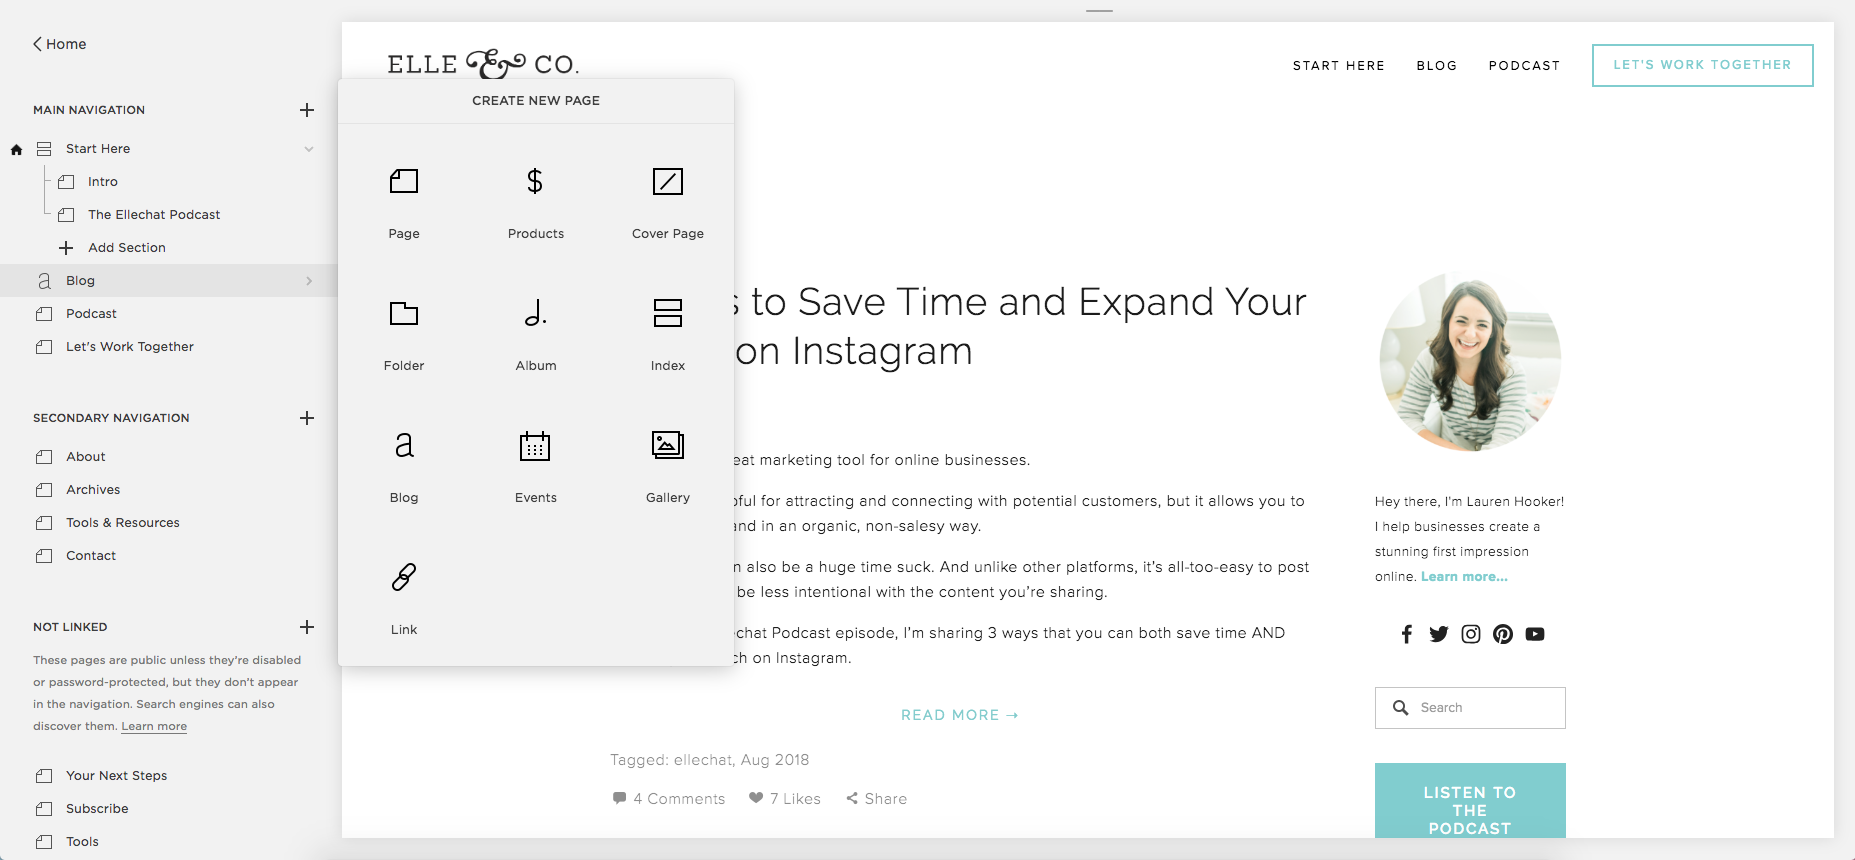
Page
This option gives you a clean slate where you can add combinations of blocks that form a custom layout of text, images, audio, forms, and more. Because of its versatility, it’s a great choice for a majority of your content.
Products
This page option is customized for store owners. It allows you to create a page to house all of your products.
Cover Page
A Cover Page allows you to present information on a single bold page (usually with full bleed images) and make a powerful introduction to your site. You can even use a combination of Cover Pages and Pages to create a unique and customized feel to your site.
Folder
Folders aren’t technically a page, but they’re the secret to creating a drop down menu that houses several pages.
Album
Album pages allow you to upload music and allows visitors to listen to your tracks.
Index
An Index page displays your content by using thumbnail images to link to pages or organize gallery content.
Blog
The Blog page holds a collection of blog posts.
Events
The Events page can be used as a calendar or list of events like speaking engagements, meetings, and public events.
Gallery
Gallery pages allow you to showcase a collection of images and videos. This is especially helpful for photographers, designers, and artists.
Link
The Link page isn’t technically a page either. Instead, it connects to another website or page within your own site.
Things to consider when setting up your pages
When you add a Page to your site, you have two options: start with a blank slate or choose a starter layout.

Starter layouts are professional designs for pages with pre-arranged placeholders. The placeholders give you an idea of what your page might look like.
By using a starter layout, you can build a page using a structure design for a specific purpose without spending too much time rearranging page elements.
If you want to get your website up and running as fast as possible, this may be a good option for you.
There are multiple page layouts (with different purposes) for the starter layouts.
About
All purpose, with a mix of body text, headers, and images.
Contact
Different combinations of forms, maps, addresses, phone numbers.
Details
All purpose, with a mix of text and images arranged in different columns and rows.
Features
Detailed layouts for features, services or products.
Images
Different layouts of image blocks that create varying gallery styles. These layouts are great for creating thumbnail navigation.
Team
Common layouts for team pages, featuring different combinations of headshots, names, and bios.
Other
Options for displaying a menu, a stock list/multiple store locations, or online booking.
Customizing your pages
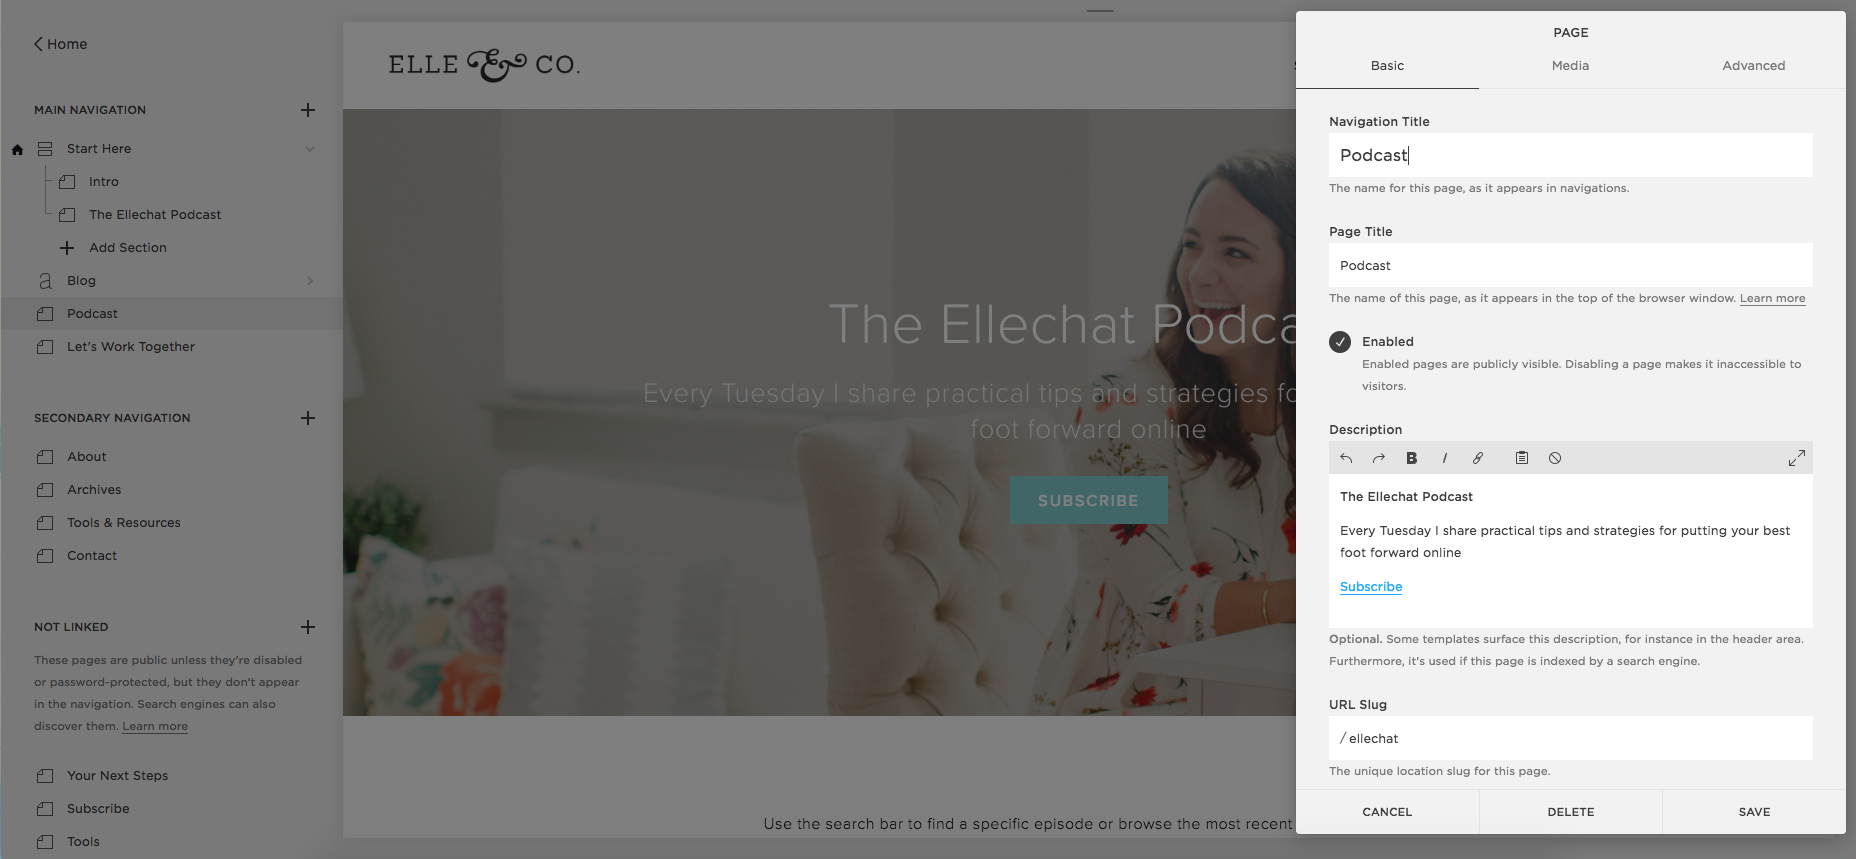
Once you create a new page, you can go into the page settings by hovering over the page in the left-hand menu and clicking on the gear icon that appears on the right-hand side.
Here you can name the page, add a description of the page for SEO purposes, disable it from being accessible while it's being worked on, give the page a unique URL, set it as your homepage, and even set a password if you would like to password protect the content on the page.
Blocks
Once you’ve set up the page settings, it’s time to customize your page. You can do this by hovering your mouse over the page on the right-hand side of the screen and clicking Edit.

Squarespace pages are built and customized using blocks.
Blocks allow you to add content to pages. You can add, move, and combine blocks on a page to create a custom layout. Each block is designed to add different types of content to most areas of your site.
To add a new block, hover your mouse over the left side of your screen and an insert point (black tear drop) will appear. Click on it to bring up the block menu. From there you can choose the block you would like to insert and continue to build out the pages on your website.

Here’s a run down on all the blocks you can add to a page.
Basic
Text
The Text Block is the primary means of adding text to your site. It allows you to add headings, quotes, pre-formatted text, links, and lists.
Markdown
The Markdown Block allows you to add text using the Markdown language. To use this block, you should have knowledge of the Markdown language.
Quote
You can use the Quote Block to add styled quotes and testimonials to your site. Each template has a default style for the Quote Block that you can change in the Style Editor.
Image
The Image Block adds a single image to a page or blog post.
Video
The Video Block adds an externally hosted video to your site. It’s important to note that Squarespace doesn’t support uploaded video. When embedding a video using a URL, only YouTube, Vimeo, Animoto, and Wistia are supported. You can use the Embed Block for other hosting services. This is how I embed my Ellechats using code from Crowdcast.
Spacer
The Spacer Block adds an adjustable amount of space between blocks. This is the primary method for adding and resizing blocks and images on a page or blog post.
Line
The Line Block adds a horizontal line between blocks on your site. This is a great way to break up text or visually separate other elements.
Button
You can the Button Block to add buttons and calls-to-action to your site. Button blocks can link to content on your site, external content, or downloadable files.
Audio
The Audi Block adds a single audio file in a payer to a page or blog post. You can upload a file from your computer or link to an externally hosted file.
Embed
The Embed Block adds external content to your site by using links to tweets, videos, and more.
Image Layouts
Poster
The Poster Block displays text over an image.
Card
The Card Blocks aligns text to the left or right of an image.
Overlap
The Overlap Block displays an image on one side with text on the other, partially overlapping the image.
Collage
The Collage Block displays an image on one side and text over the background “card”, offsetting and overlapping the image.
Stack
The Stack Block displays an image with text below.
Gallery
Slideshow
The Slideshow Block adds a slideshow of images and videos to a page or blog post. Clicking an item will display the next image or video in the gallery.
Carousel
The Carousel Block adds a gallery of images and videos to a page or blog post in a horizontal strip without any space between the items. This is the block I use to display related blog posts at the end of each of my blog posts.
Grid
The Grid Block adds a gallery of images and videos to a page or blog post in a symmetrical grid.
Stack
The Stack Block adds a gallery of images and videos to a page or blog post in a single column with one pixel of space between item. This is a great option if you want visitors to scroll up and down your gallery. It's also a time-saving alternative to adding multiple image blocks on top of each other.
Summary
Wall
The Wall Block presents your content in a masonry-style grid. The masonry design is growing increasingly popular on the web, you you've likely seen it before, like on Pinterest. It works by positioning items in the best layout based on the available space while reducing any gaps, giving it the look of a mosaic.
Carousel
The Carousel Block presents your content in a slideshow-like format, with a set number of items at a time and arrows for navigation. This is a great option if you want visitors to browse through any featured content in a scrolling carousel.
List
The List Block presents your content in one column with thumbnails on one side and text on the other. This is a great option if you want to display existing content in a linear, straightforward layout that may not be available in your template's design.
Grid
The Grid Block presents your content in an even grid.
More
Form
Use the Form Block to add a form to a page that collects information from visitors. You can use this to create a survey, poll, signup forms, or application.
Newsletter
The Newsletter Block lets visitors sign up for a newsletter or receive updates to your blog.
Map
The Map Block emeds a Google Map on your site. This is a great way to display the location of your business or event. You can use the Design tab to add color to your map and set its style.
Code
The Code Block allows you to add custom code to a page or display code on a page. The Code Block is a good option if you want to embed a third-party feature on your site.
Menu
You can use the Menu Block to display your restaurant's menu on your site. This is a great alternative to embedding .pdf menus on a site, which aren't always as SEO-friendly as on-page content. Squarespace scans the text you add in the menu block for certain formatting. If it detects certain patterns in how you entered the text, it transforms it into different sections of the menu.
Calendar
The Calendar Block organizes content collections into a calendar sorted by day. You can use the Calendar Block to display content from an events, blog, gallery, products, or album page.
Acuity
The Acuity Block displays a client scheduler visitors can use to book appointments.
Zola
The Zola Block allows you to add a wedding registry to your website. This is best for those creating a wedding website using Squarespace.
OpenTable
The OpenTable Block adds restaurant reservation booking abilities. You’ll need your OpenTable Restaurant ID.
Bandsintown
Bandsintown display tour dates from your Bandsintown profile.
Filters & Lists
Search
The Search Block allows visitors to search for content on your site. You can configure the search block to return results from across your site or limit results to one content collection.
Content Link
The Content Link Block creates a visual link to a content collection or page. This is a great way to display content in multiple places on your site.
Tag Cloud
The Tag Cloud Block displays tags and categories from a blog, gallery, album, or product page in a graphic cloud formation. You can display the tags in alphabetical order, by weight, or by activity. The Tag Cloud Block is an eye-catching way to display the subjects of your blogs or galleries and gives visitors an interesting option to discover the topics you cover. It's common to place this block in a sidebar.
Archive
The Archive Block displays an organized list of content links.
Commerce
Product
The Product Block adds a product to a page or blog post. This is a great way to promote a product or display products in different combinations than your Product pages.
Amazon
The Amazon Block displays and links to an item on Amazon. This is useful if you participate in Amazon’s Affiliate program.
Donation
The Donation Block allows visitors to donate to your cause or organization. This block requires a connected Stripe account.
Charts
Bar Chart
The Bar Chart Block adds a bar chart in a visually appealing way.
Line Chart
The Line Chart Block adds a line chart in a visually appealing way.
Pie Chart
The Pie Chart Block adds a pie chart in a visually appealing way.
Social
Display a feed of your most recent tweets and a follow button.
Foursquare Swarm
Add a feed of your Foursquare check-ins.
Social Links
Add social icons that link to your social media profiles. This is an alternative if your template doesn’t have default social icons.
RSS
Add a link to the RSS feed or a Blog page.
500px
Add images from your 500px account.
Add a gallery of your Instagram photos.
Flickr
Add a gallery of your Flickr photos.
SoundCloud
Embed a SoundCloud player.
Things to consider when setting up your blocks
Moving blocks around the page can be one of the most frustrating parts of adding content to your page (especially for beginners).
Pay close attention to the thin black line that appears when you move blocks around. Not only will this thin black line indicate where the block will land when you release it, but the length and orientation of the line will indicate how the block will look when you release it.
For example, a thin black line that spans the entire width of the area you’re editing means the block will take up the entire width of the area you’re editing.

On the other hand, a thin black line that’s been truncated will only take up the width of the truncated line.

Customizing your blocks
After you’ve added multiple blocks to a page, you can drag and drop the blocks to customize the overall look of the page.
You can:
Move blocks to add columns, rows, or floating blocks
Resize blocks using the Spacer block
Stack blocks on top of each other to arrange how blocks will appear on mobile devices
For more help moving and resizing blocks, Squarespace has a help file all about moving blocks.
While it may be tempting to dive right into the design of your site, laying a foundation for your site with navigation menus, pages, and blocks will help users easily find their way around your site and enhance your site’s usability.
Squarespace provides you with many options for page layouts and blocks. But once you understand all the options available to you, setting up pages and blocks will become second nature!
Which pages were the easiest for you to set up in your Squarespace site? The most difficult? Which blocks are your favorite to use? Let me know in the comments!
