Trying to keep up with my inbox has always felt like running a race with no finish-line in sight.
I receive emails throughout my day that I’m not always able to act on, the emails pile up in my inbox, and then my inbox starts to stress me out so I put off the task of tackling it until later.
When I do finally get around to answering all the emails, I have some momentary relief…
...until the email replies start flooding in. And then the cycle starts all over again.
I’ve tried some email tricks here and there and even shared them on my blog and in my newsletter from time to time, but I never came up with a system that truly worked.
Until this past month.
One of my 2017 goals was to stop whining about my inbox and come up with a system that allows me to stay on top of emails and stop stressing about them.
With the help of a great productivity book and some organization, I’ve been able to keep my inbox at zero for the past three weeks and I feel completely confident that I can keep it up.
This new email system has been revolutionary for my workdays and has given me so much peace of mind.
So in typical Elle & Company fashion, I’m sharing it with you to help you conquer your inbox once and for all.
1 | Create color-coded folders
Having a folder system is crucial to keeping track of emails and staying at inbox zero (which I’ll get to in just a moment).
So create folders for each category or “arm” of your business to keep your inbox organized.
My Gmail categories include:
- Design Clients
- Coaching Clients
- Contact Form Submissions (from the Contact page on my website)
- Courses
- Internal (for emails between me and my assistants, online bank statements, etc.)
- Networking
- Newsletter replies
- Testimonials (from previous clients and course students)
You can create a new folder by scrolling down to the bottom of the lefthand menu in your Gmail inbox and clicking Create New Label.
A window will appear where you can name your label.
You can also choose to make your new label a subfolder.
So if you had a main label for Contact Form Submissions but you wanted to keep service inquiries separate from general FAQs, you could create a Service Inquiry label and nest it under the Contact Form Submissions folder.
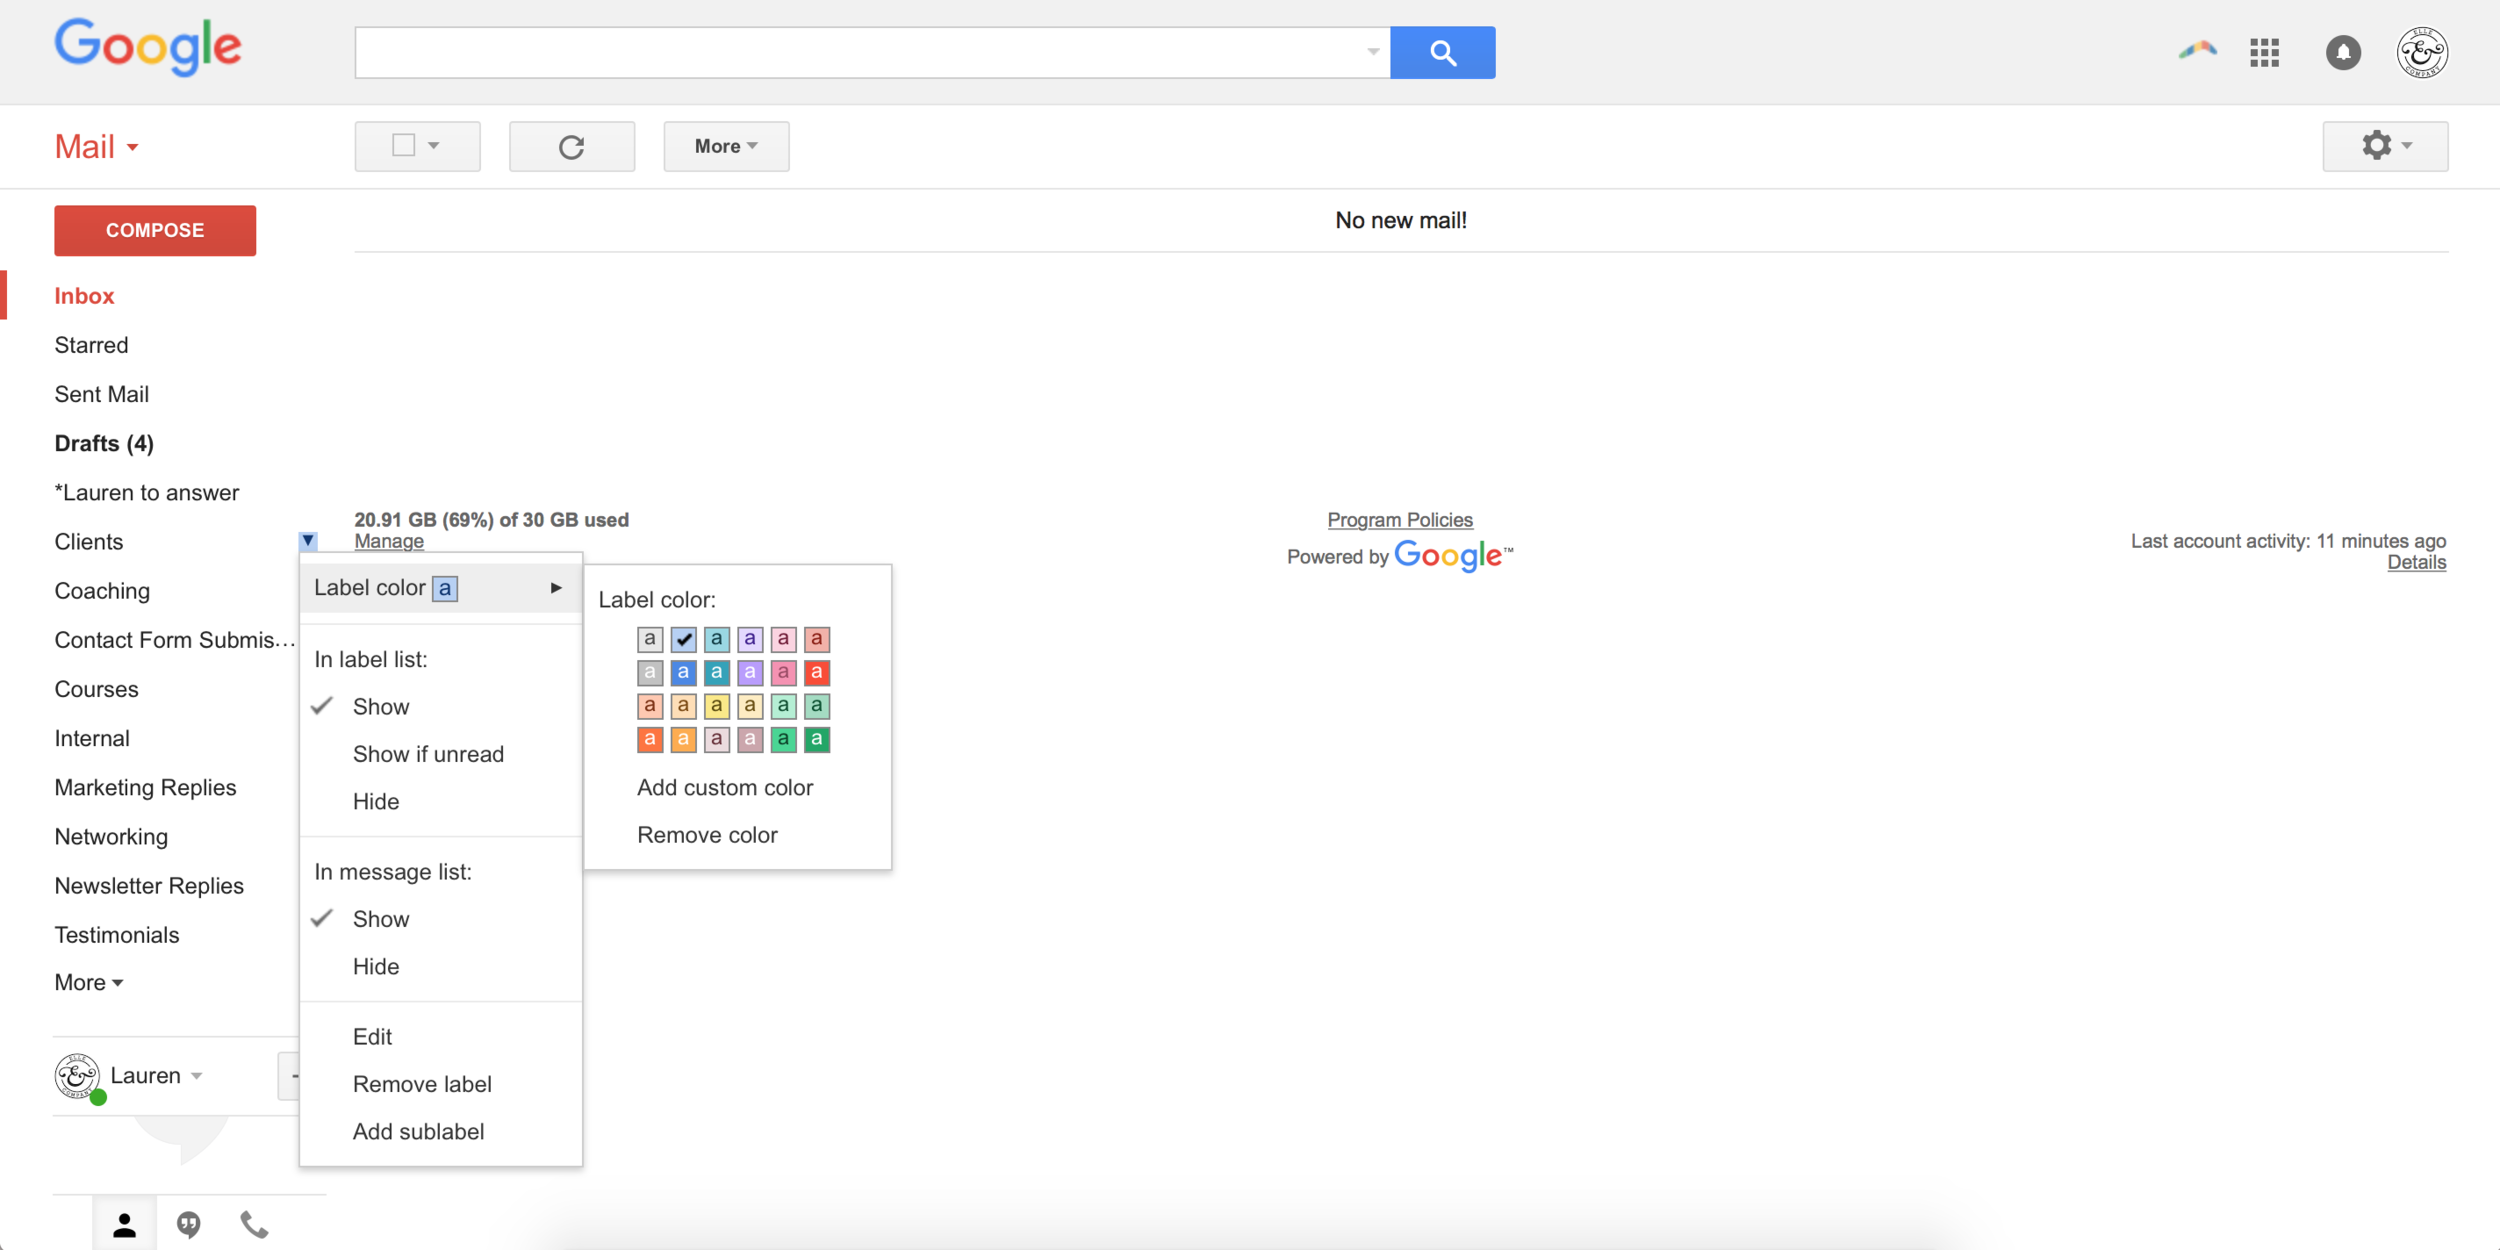
You can take these folders one step further by color-coding them.
I prefer to do this for two reasons: (1) they create visual organization in my inbox and help me differentiate between the different types of emails I need to reply to and (2) they make my inbox a little easier on the eyes.
Assigning colors to your new folders is super simple. Hover over the folder, click the dropdown arrow that appears, click Label color, and choose the color you want to assign to it.
You can even add a custom color by clicking Add custom color at the bottom of that same window.
Each time a new email reply pops up that’s already been filed, you can see the assigned label right in your inbox.
2 | Reach Inbox Zero
For some of you (like my husband who never deletes an email and has 10,000+ emails sitting in his inbox), this might seem like a really daunting task.
But I promise this step will pay dividends and give you a lot of peace of mind in the long run.
Go through your inbox and account for every single email by either:
- Deleting it
- Or filing it away in one of your new folders
If the email requires action and it will take you less than 2 minutes to complete, go ahead and take care of it now. Once you’ve finished the email by either sending a reply or taking the action required, delete the email or file it away in one of your new folders.
If the email requires action and it will take you more than 2 minutes to complete, add the task to your to-do list, file the email away, and return to it during your flexible work time later.
I talk about focused work time vs. flexible work time in my recent Ellechat, Effectively Scheduling Your Work Week.
3 | Stay at Inbox Zero
Now that you’ve reached inbox zero, it’s time to keep your inbox at zero. But that’s easier said than done, isn’t it?
This is where that no-fuss system kicks in. Here are the keys to making it work:
1 | Check your email 4 times each day
Looking at your inbox multiple times a day can be a huge distraction.
Especially if you keep your inbox up in your browser while you’re working or you receive email notifications on your phone.
And I say this from experience. I had a bad habit of keeping both of my Gmail inboxes up in my browser at all times, so I was able to keep tabs on new emails landing in my inbox, almost immediately.
I would be writing a blog post, glance up at the inbox tab on my browser, check the email, and leave it to return to later. This happened multiple times an hour.
Such a waste of time!
Instead, I’ve made a habit of checking emails 4 times a day:
- At the beginning of my workday
- Before I take a break for lunch
- After I return from my lunch break
- At the end of my work day before signing off
This new system has allowed me to stay on task and keep from getting distracted by emails throughout my workday.
It also protects my personal time. I no longer check email outside of work hours, which means more focused time with my friends and family.
This email schedule also sets boundaries and expectations with clients, course students, and peers because I’m only replying to them on weekdays between the hours of 8:30am and 6:00pm.
2 | Answer each email in order and only look at an email one time
Each time you open your inbox, your goal should be to get it back down to zero.
To cut back on time and help you knock out your responses, answer emails in order and only look at them one time.
Then follow that same system I mentioned earlier:
- Delete the email
- Or file the email away
If the email requires action and it will take you less than 2 minutes to complete, go ahead and take care of it. Once you’ve finished the email by either sending a reply or taking the action required, delete the email or file it away.
If the email requires action and it will take you more than 2 minutes to complete, add the task to your to-do list, file the email away, and return to it during your flexible work time later.
Bonus step | Create canned responses for the emails you receive on a regular basis
Do you find yourself writing the same emails over and over? Create canned responses for your most popular email replies to save some time in your inbox!
You can do this by copying and pasting your standard replies into Evernote or a Google Doc and referring back to them later. But there’s a feature right in Gmail that allows you to store your canned responses and easily add them to your email replies.
To set it up, click the gear in the top righthand corner of your inbox and choose Settings.
Click the Labs tab, find Canned Responses, and click the Enable button. Then be sure to scroll down to the bottom of the page and click Save Changes.
Next, write the email message you want to use over and over again before clicking the arrow in the lower righthand corner of your New Message window.
Choose Canned Responses and select New Canned Response under the Save heading.
Each time you want to use a canned response, click the arrow button in the lower righthand corner of your message window, click Canned Responses, and choose the canned response you want to use under the Insert heading.
Your response will appear in your reply and you can make small edits (if necessary) before sending it off.
Just one more little inbox trick to save you time and keep your email under control.
Don’t make the task of answering emails harder than it has to be.
Resolve to create a system for your inbox and stick to it! It will save you a lot of time and frustration in the long run.
Do you have a system for staying on top of emails? Which of the tips above are you going to implement?
If you enjoyed this post, you’ll love the tips and resources I send out each week in the Elle & Company newsletter! Subscribe by entering your name and email address below:


