If you’re looking for a user-friendly, professional website builder for your website, look no further than Squarespace.
This all-in-one platform is intuitive, all-inclusive, and includes several beautiful, compatible templates. You can see all of my favorite Squarespace features in this post.
But while Squarespace sites are easy to set up and use on the backend, it takes a little creativity to customize the templates and make them your own.
Thankfully, there’s a feature built into each Squarespace site that allows you to make simple design changes: the Style Editor.

What it is
The Style Editor allows you to make changes to the look of your site, like colors, fonts, backgrounds, and spacing.
The options included in the style editor are called “tweaks,” and you can easily test the tweaks and see a preview of the changes as you’re making them.

The tweaks available to you depend on the template you’re using.
Some allow you to enable a blog sidebar, and some don’t. Some allow you to customize the appearance of all 3 header styles, some only allow you to set 1 font for all of your headings.
So it’s often helpful to take a template for a test drive and look at the Style Editor to see how much customization is available to you before you use it for your website. (You can do this by setting up a free trial site).
Where to find it
The tweaks in the Style Editor also depend on the page of your website you’re currently previewing on the right side of your screen.
They vary according to the type of page:
Cover Page
Blog Page
Events Page
Gallery Page
Index Page
Products Page
It’s important to note that any changes you make in the Style Editor for a Gallery page will alter all of your Gallery pages. The same goes for all of the other page types listed above.
So before you open the Style Editor, make sure you’re on the page you want to edit and take note of the type of page you’re editing.
Then, go out to the main menu and click Design > Style Editor.

All of the tweaks available to you will show up on the left side of your screen, but you can also click around on the right side of the page to pull up the tweaks specific to those areas.
For example, if you want to change the style of your headers, you can click the header text on your preview page. The Style Editor will remove all of the other tweaks that aren’t associated with the header so you can easily make changes to it.

To see all of the options again, click Show All at the top of the menu.
Quick tip: It’s always best to edit your Squarespace site in Chrome or Firefox. For some reason, Safari will often refresh the page and cause you to lose the changes you’ve made before clicking Save.
Common style tweaks
Even though each template has different tweaks available, there are some commonalities among them. Each template has default styles, but you can replace them in the Style Editor.
The images below are from Squarespace’s Support pages.
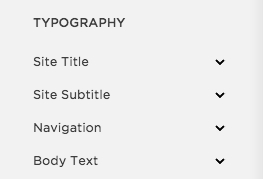
Typography
Squarespace has a font library of 600 Google fonts and 1000 Typekit fonts.
The font menus in the Style Editor are curated according to popularity. You can scroll down to see all of the fonts available in that shortened list or you can use the menu’s search field to search the complete font library.
Squarespace organizes the font tweaks into groups like Body Text, Headings, and Navigation Text.
Depending on your template, you can adjust:
- Font
- Font Size
- Line Height (space between lines of text)
- Letter Spacing (space between letters)
- Text Transform (none, capitalize, uppercase, or lowercase)
- Text Decoration (none, underline, overline, or line-through)
- Text Align (left, center, right)
Keep in mind that the changes you make for each of these options apply to the entire site. For example, changing the font style for your Body Text will change the Body Text on every page. This was an intentional move by Squarespace to make sure your site looks unified and professional.
If you ever want to use custom fonts, you can utilize Squarespace’s integration with Typekit.
Colors
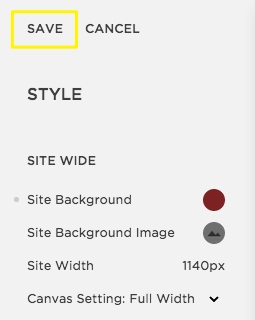
Every color tweak has a colored circle next to its label. Click the circle to make changes to the color.
A color picker will appear and you can either choose a color on the color wheel or enter values according to these formats:
Hex - (#FFFFFF)
RGB (250, 0, 149, 1)
HSL (325, 100%, 50%, 1)
HTML - White

You can also adjust the transparency by using the opacity slider. A is completely transparent and 1 is completely opaque. You can also check Transparent at the bottom of the dialogue box.
When you’re finished selecting your color, click anywhere outside the color wheel window to return to the Style Editor menu.
Sizes & values
Size changes are usually measured in pixels and usually involve tweaks like padding, spacing, width, and borders.
To make a size tweak, use the slider or enter a number manually in the field.

Aspect ratio
Aspect ratio tweaks usually relate to the height and width of an image and crop it according to a ratio (like a 1:1 Square).Sometimes the aspect ratio is set to Auto, which means that the images will rearrange to best fit the page.
Background image
Not every template will include this tweak, but those that do usually have a site-wide or page background image.
To add one, click the circle next to the Site Background Image label and upload your image.
Squarespace also allows you to add a licensed image from Getty Images (although you do have to pay for the image you choose from their library).

Background image tips:
- For full-bleed background images, Squarespace recommends using a photo that’s 1500 pixels wide.
- Landscape images often work better than portrait formats.
- Because Squarespace is compatible across all platforms and screen sizes, it often crops background images. So abstract patterns and text-less images generally work best.
- Background images don’t transfer if you ever decide to switch your template.
Banner image
Similar to background images, banner images aren’t included in every template.
If a template includes a site-wide banner, it can be uploaded via the Style Editor. If a template includes a page banner, it can be added via Page Settings.
To add a banner image, click the circle next to Header Background Image and either upload a photo or choose from the Getty Images library.

Sidebar
Not every template includes a sidebar, but those that do usually have some blog sidebar tweaks included in the Style Editor. These options vary from template to template.
To find sidebar style tweaks, click on the sidebar in the page preview or look for the Sidebar heading in the Style Editor.

Hiding and showing
Depending on your template, you can hide features like your site description, page titles, social icons, borders, banners, and footers.
These tweaks are usually checkmarks under the Options section.

Undoing and saving your changes
Each time you make a tweak in the Style Editor, a light gray dot appears to the left of the label. To undo the change, simply click the dot.

After you’ve made all the changes necessary, scroll back up to the top of the Style Editor and click Save.
Now the changes will appear on your live site.
If for some reason you want to start all over, you can reset all the options in the Style Editor by clicking Reset All to Defaults at the bottom of the menu.

This will take your site back to your template’s default settings for colors, fonts, sizes, etc.
Do you want to customize your site even more?
If you want to make more changes to the look of your Squarespace site, you can always add custom code in the CSS Editor. You can access it by visiting the Home Menu and clicking Design > Custom CSS.
By making some simple tweaks in the Style Editor, you can quickly customize the appearance of your Squarespace site.